Help Article

What to Do If Your Website Gets Hacked or Has Malware

What to Do If Your Website Gets Hacked or Has Malware 2560 1440 Ohenewa Anno

A hacked website can affect your business, customers, and online reputation. Knowing what to do can help prevent further damage.
Signs Your Website May Be Hacked

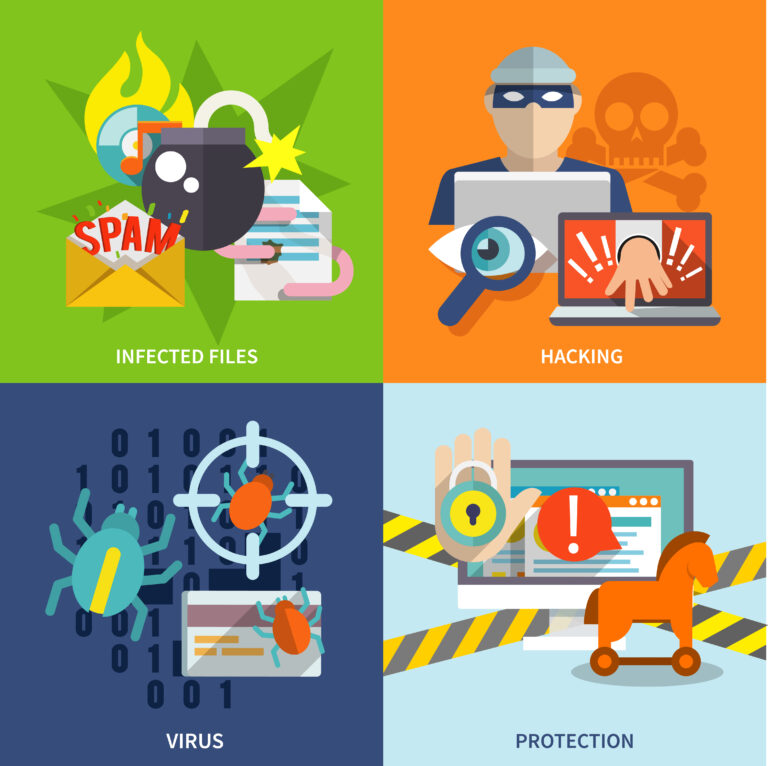
– Your website redirects to unknown websites.
– Strange pages, posts, or advertisements appear.
– You cannot log in to your website.
– Google displays a security warning.
– Unknown administrator accounts appear.
– Your website starts sending spam emails.

What Should You Do?
If you notice any of these signs:

– Contact your developer or hosting provider immediately.
– Change your passwords using a secure device.
– Check your backups to see if a clean version is available.
– Limit website access if visitors may be at risk.
– Request a malware scan to identify the problem.

What Should You Avoid?

Don’t delete website files without knowing what they do.
Don’t install random security plugins.
Don’t restore backups without checking them.
Don’t ignore security warnings.
How Can You Prevent Future Attacks?

Keep WordPress, themes, and plugins updated.
Use strong passwords and two-factor authentication.
Back up your website regularly.
Remove unused plugins and user accounts.
Monitor your website for suspicious activity.

You can check Malware Revention Guide here.

Need Help With Your Website?

If your website has been hacked or you notice unusual activity, contact BrushPic for assistance.
We can help assess the issue and recommend the next steps to secure your website.
Contact BrushPic: www.brushpic.com
Remember: Acting quickly can help reduce damage and protect your business.
Malware Prevention Guide

Malware Prevention Guide 2560 1707 Ohenewa Anno

Website malware is much easier to prevent than to clean up. Regular updates, secure logins, reliable backups, and ongoing monitoring can significantly reduce the risk of an infection and make recovery easier if something does go wrong.

Keep WordPress, Plugins, and Themes Updated

Outdated software can contain security vulnerabilities that attackers may exploit.

  • Keep WordPress core up to date.
  • Update plugins and themes regularly.
  • Remove plugins and themes you no longer use.
  • Avoid abandoned plugins that are no longer maintained by their developers.
  • Never install nulled or pirated themes and plugins.

Before making major updates, make sure a recent backup is available and confirm compatibility when necessary.


Protect Website Logins

Administrator access should be limited and protected.

  • Use strong, unique passwords for WordPress, hosting, and other website-related accounts.
  • Do not reuse passwords across multiple services.
  • Enable two-factor authentication (2FA/MFA) when available.
  • Give administrator access only to people who need it.
  • Remove old or unused user accounts.
  • Avoid sharing passwords through unsecured messages.

Whenever possible, each person who works on the website should have their own account rather than sharing one administrator login.

Maintain Reliable Backups

Backups are an important part of both prevention and recovery.

  • Back up the website regularly.
  • Keep backups in a separate, secure location when possible.
  • Know how frequently backups are created and how long they are retained.
  • Make sure both website files and the database are included.
  • Periodically confirm that backups can actually be restored.

A backup should not be assumed to be clean after an infection. If malware is discovered, the backup should be checked before restoration.

Monitor Your Website

Some malware can remain unnoticed for a long time. Regular monitoring can help identify problems earlier.

Watch for:

• Unexpected redirects to unfamiliar websites.
• Unknown pages, posts, advertisements, or links.
• New administrator accounts you did not create.
• Unexpected changes to website content.
• Browser or Google security warnings.
• Suspicious emails being sent from your website.
• Unusual website downtime or performance problems.

Security monitoring and reputable malware scanning tools can also help detect suspicious activity.

Limit Website Access and Use Trusted Software

Every additional login, plugin, or third-party connection can create another potential point of access.

• Install plugins and themes only from reputable sources.
• Remove software and integrations that are no longer needed.
• Limit administrator privileges when a lower access level will work.
• Remove access for former employees, contractors, or developers who no longer need it.
• Keep hosting, database, FTP/SFTP, and other technical credentials secure.

What to Do If You Suspect Malware

If you notice suspicious activity:

1. Contact your website developer, hosting provider, or BrushPic.
2. From a trusted device, change potentially compromised passwords.
3. Confirm whether a clean backup is available.
4. Avoid deleting unfamiliar files unless you know what they are.
5. Do not install random security tools in an attempt to fix the problem.
6. If visitors may be at risk, temporarily restrict access to the website while the issue is investigated.

If customer or sensitive information may have been exposed, seek appropriate guidance about any required notifications.

You can check What to Do If Your Website Gets Hacked or Has Malware here.

How a Malware Infection Is Usually Addressed

Depending on the infection, a developer or security specialist may need to:

• Scan website files and the database.
• Identify and remove malicious code.
• Remove unauthorized users or access.
• Restore clean files or a verified clean backup.
• Update vulnerable WordPress components.
• Reset compromised credentials.
• Test the website after cleanup.
• Monitor for reinfection.

If Google has flagged the website as unsafe, an additional review may be required after the malware has been removed.

Ongoing Website Maintenance

Website security is not a one-time setup. Someone should be responsible for regularly reviewing updates, backups, user access, and website health.

A basic maintenance routine should include:

• WordPress, plugin, and theme updates.
• Regular website backups.
• Security and malware monitoring.
• Review of administrator accounts.
• Removal of unused plugins, themes, and integrations.
• Periodic checks that the website is functioning normally.

Need Help?

Contact BrushPic if you believe your website has been compromised, receive a security warning, notice suspicious activity, or need help with website maintenance.

BrushPic can also provide ongoing website maintenance for businesses that do not have someone regularly monitoring updates, backups, and website security.

info@brushpic.com
www.brushpic.com

How to Back Up Your WordPress Website

How to Back Up Your WordPress Website 1536 1024 Ohenewa Anno

Before making updates to your website, it’s important to ensure a recent backup is available. A backup allows your website to be restored if something goes wrong during an update.

Step 1: Check Whether Backups Already Exist

Many websites already have backups configured.

Ask yourself:

  • Does my hosting provider create automatic backups?
  • Did BrushPic set up a backup solution for my website?
  • Am I currently using a backup plugin?

If you’re unsure, contact BrushPic before proceeding.

Option 1: Backups Through Your Hosting Provider

Many hosting companies automatically back up websites daily.

Common providers that often include backups:

  • SiteGround
  • WP Engine
  • Kinsta
  • Bluehost
  • Hostinger

Log in to your hosting account and look for a section called:

  • Backups
  • Website Backup
  • Restore Points

If you can see recent backups, your website may already be protected.

Option 2: Backups Using a WordPress Plugin

Many websites use a plugin such as:

  • UpdraftPlus
  • Duplicator
  • All-in-One WP Migration

To check:

  1. Log in to WordPress.
  2. Go to Plugins → Installed Plugins.
  3. Look for a backup plugin.

If one is installed, follow the plugin’s instructions to create a backup before making updates.

Where Should Backups Be Stored?

Ideally, backups should be stored in a location separate from the website.

Examples include:

  • Google Drive
  • Dropbox
  • OneDrive
  • An external hard drive

This provides additional protection if your website experiences an issue.

When Should You Create a Backup?

Create a backup before:

  • Updating WordPress
  • Updating plugins
  • Installing new plugins
  • Making major website changes

Not Sure?

If you’re unsure whether your website is backed up or how to restore it, contact BrushPic before making any changes.

We can help verify that your backups are working correctly and ensure your website is protected before updates are made.


Making Simple Edits using Elementor

Making Simple Edits using Elementor 600 600 Ohenewa Anno

Keeping your website updated is quick and easy once you know the basics. This guide walks you through text, image, and button edits, step by step.

01. Logging In to WordPress
Go to your website login page.
Enter your username and password.
Once logged in, you will be taken to the WordPress dashboard.

02. Opening a Page in Elementor
From the dashboard, go to Pages.
Find the page you want to edit.
Click Edit with Elementor.

This will open the Elementor editor where you can make changes directly on the page.

03. Editing Text
Click on the text you want to change.
The editing panel will appear on the left side.
Update the text in the content box.
Your changes will automatically appear on the page preview.

Tips:
Keep headings short and clear.
Double-check spelling and spacing before publishing.

04. Replacing an Image
Click on the image you want to replace.
In the left panel, click the current image.
Choose a new image from the media library or upload a new one.
Click Insert Media.

Recommended:
Use clear, high-quality images.
Keep image file sizes optimized for faster loading.

05. Editing Buttons
Click on the button you want to edit.

In the left panel, you can:
Change the button text
Update the link
Adjust alignment if needed

Example:
Change “Learn More” to “Contact Us”
Update the button link to the correct page

06. Adjusting Spacing
If something looks too close or too far apart:
Click the section or widget.
Go to the Advanced tab.
Adjust the Margin or Padding values.

Quick Tip:
Small changes usually work best.
Use consistent spacing throughout the page.
Previewing Your Changes

07. Before publishing:
Click the Preview Changes icon.
Review the page on desktop, tablet, and mobile view.
Make sure everything looks correct.

Publishing Your Changes
Once you are happy with the edits:
Click the green Update button at the bottom left.
Your changes will now be live on the website.

How to Create A Blog Post in WordPress (With Photos)

How to Create A Blog Post in WordPress (With Photos) 2560 1706 Michael Okai

If you haven’t already known the importance of continuously creating blog posts in your site, then you are in for a surprise! Blogs are some of the most underrated features of a site that you can utilize. They improve your site’s SEO that will then help you rank in searches. This can get you new eyeballs leading to purchases.


Strong blogs are well researched, easy to understand and use appropriate photos. We can give you more tips, but that’s for another time ☺


WordPress can be intimidating the first time you look at it, but once you get the hang of it, it’s easy to make things work. We are here to guide you on how you can create blog posts on your site ☺

STEP 1: Add New Post

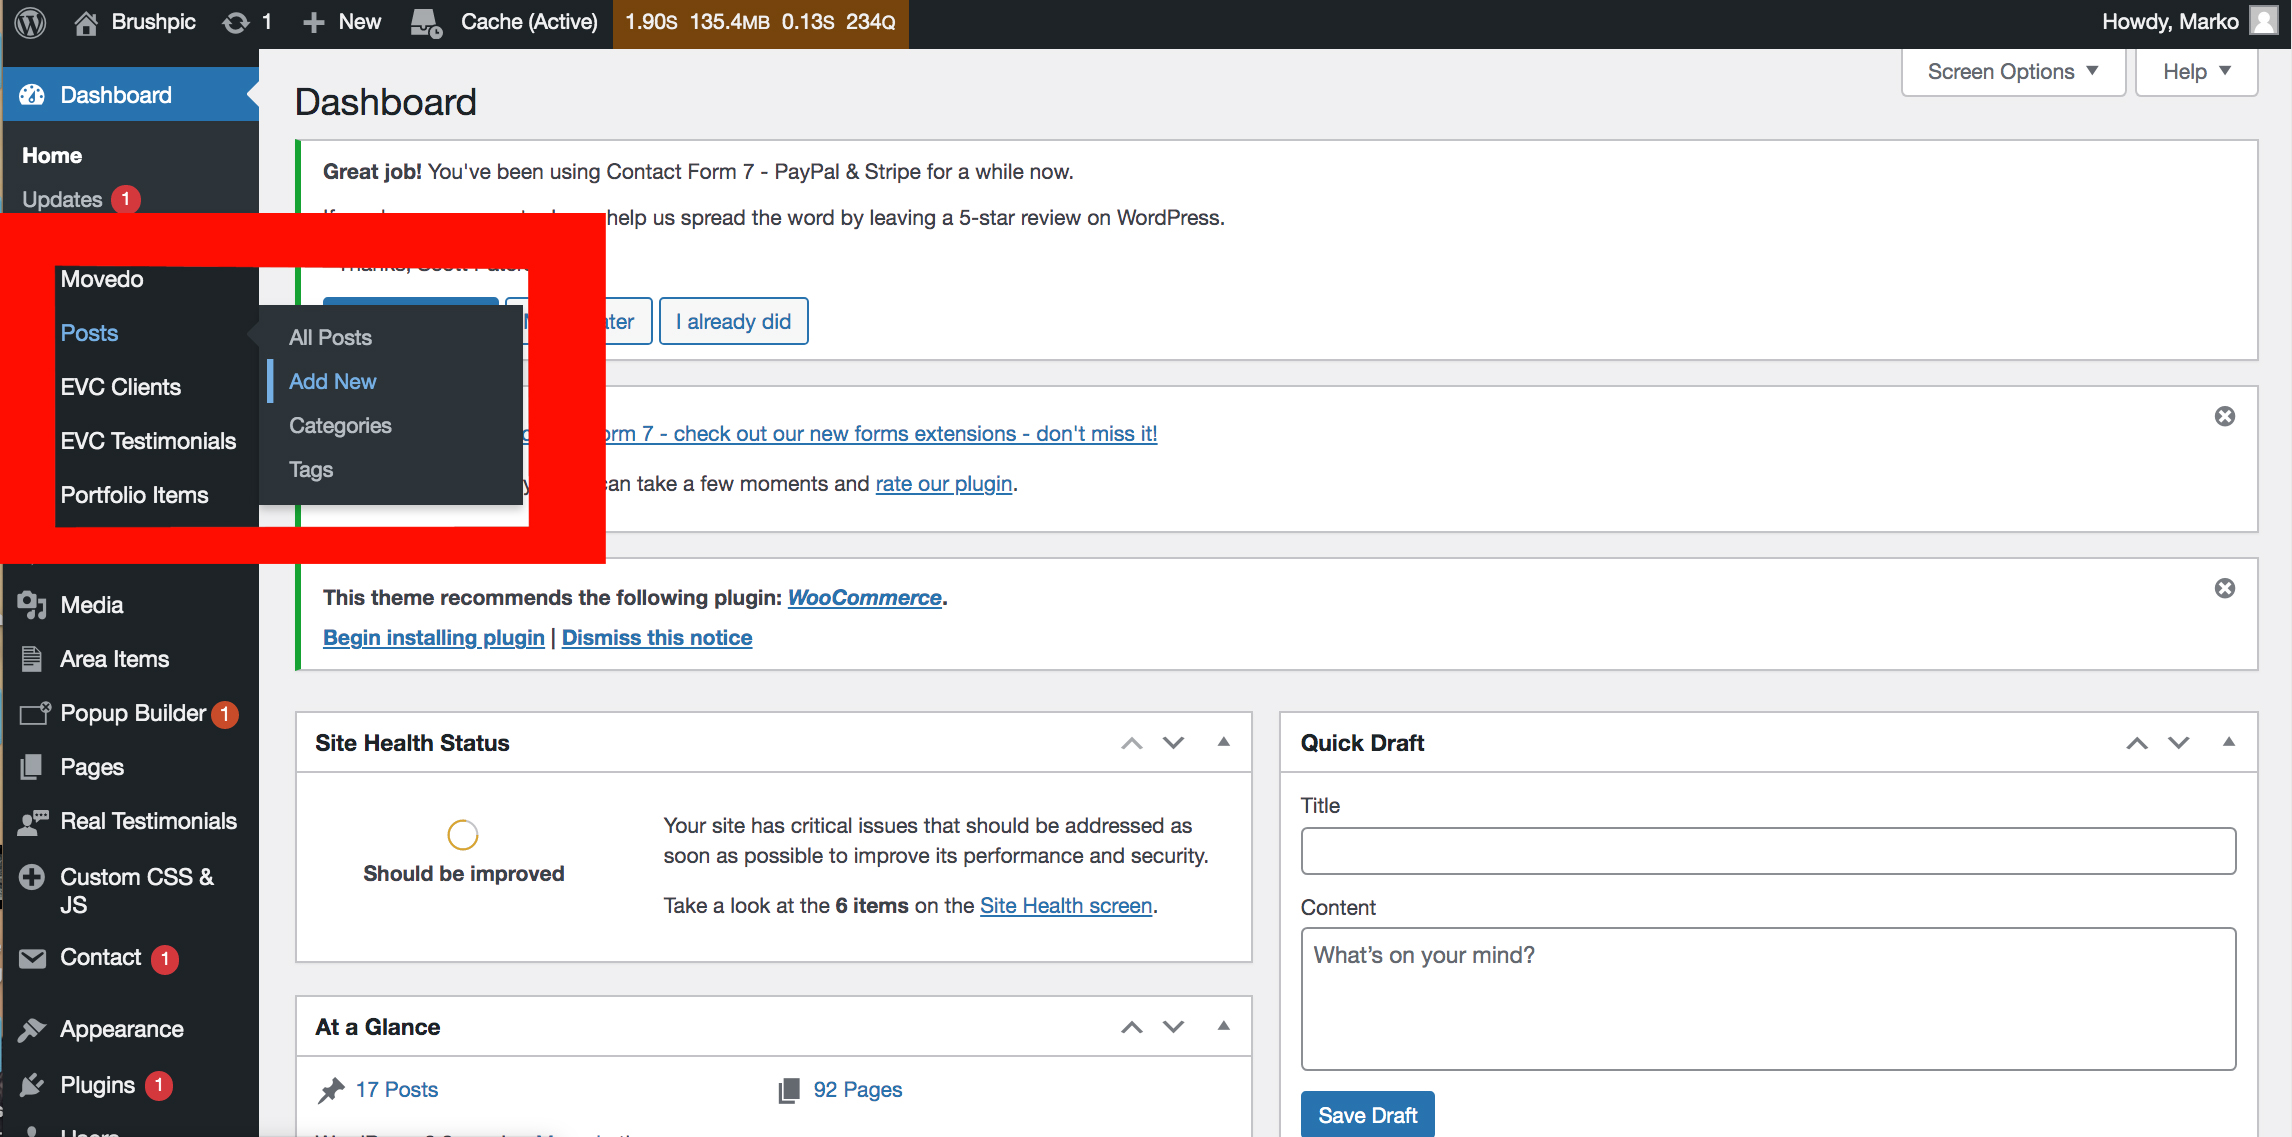
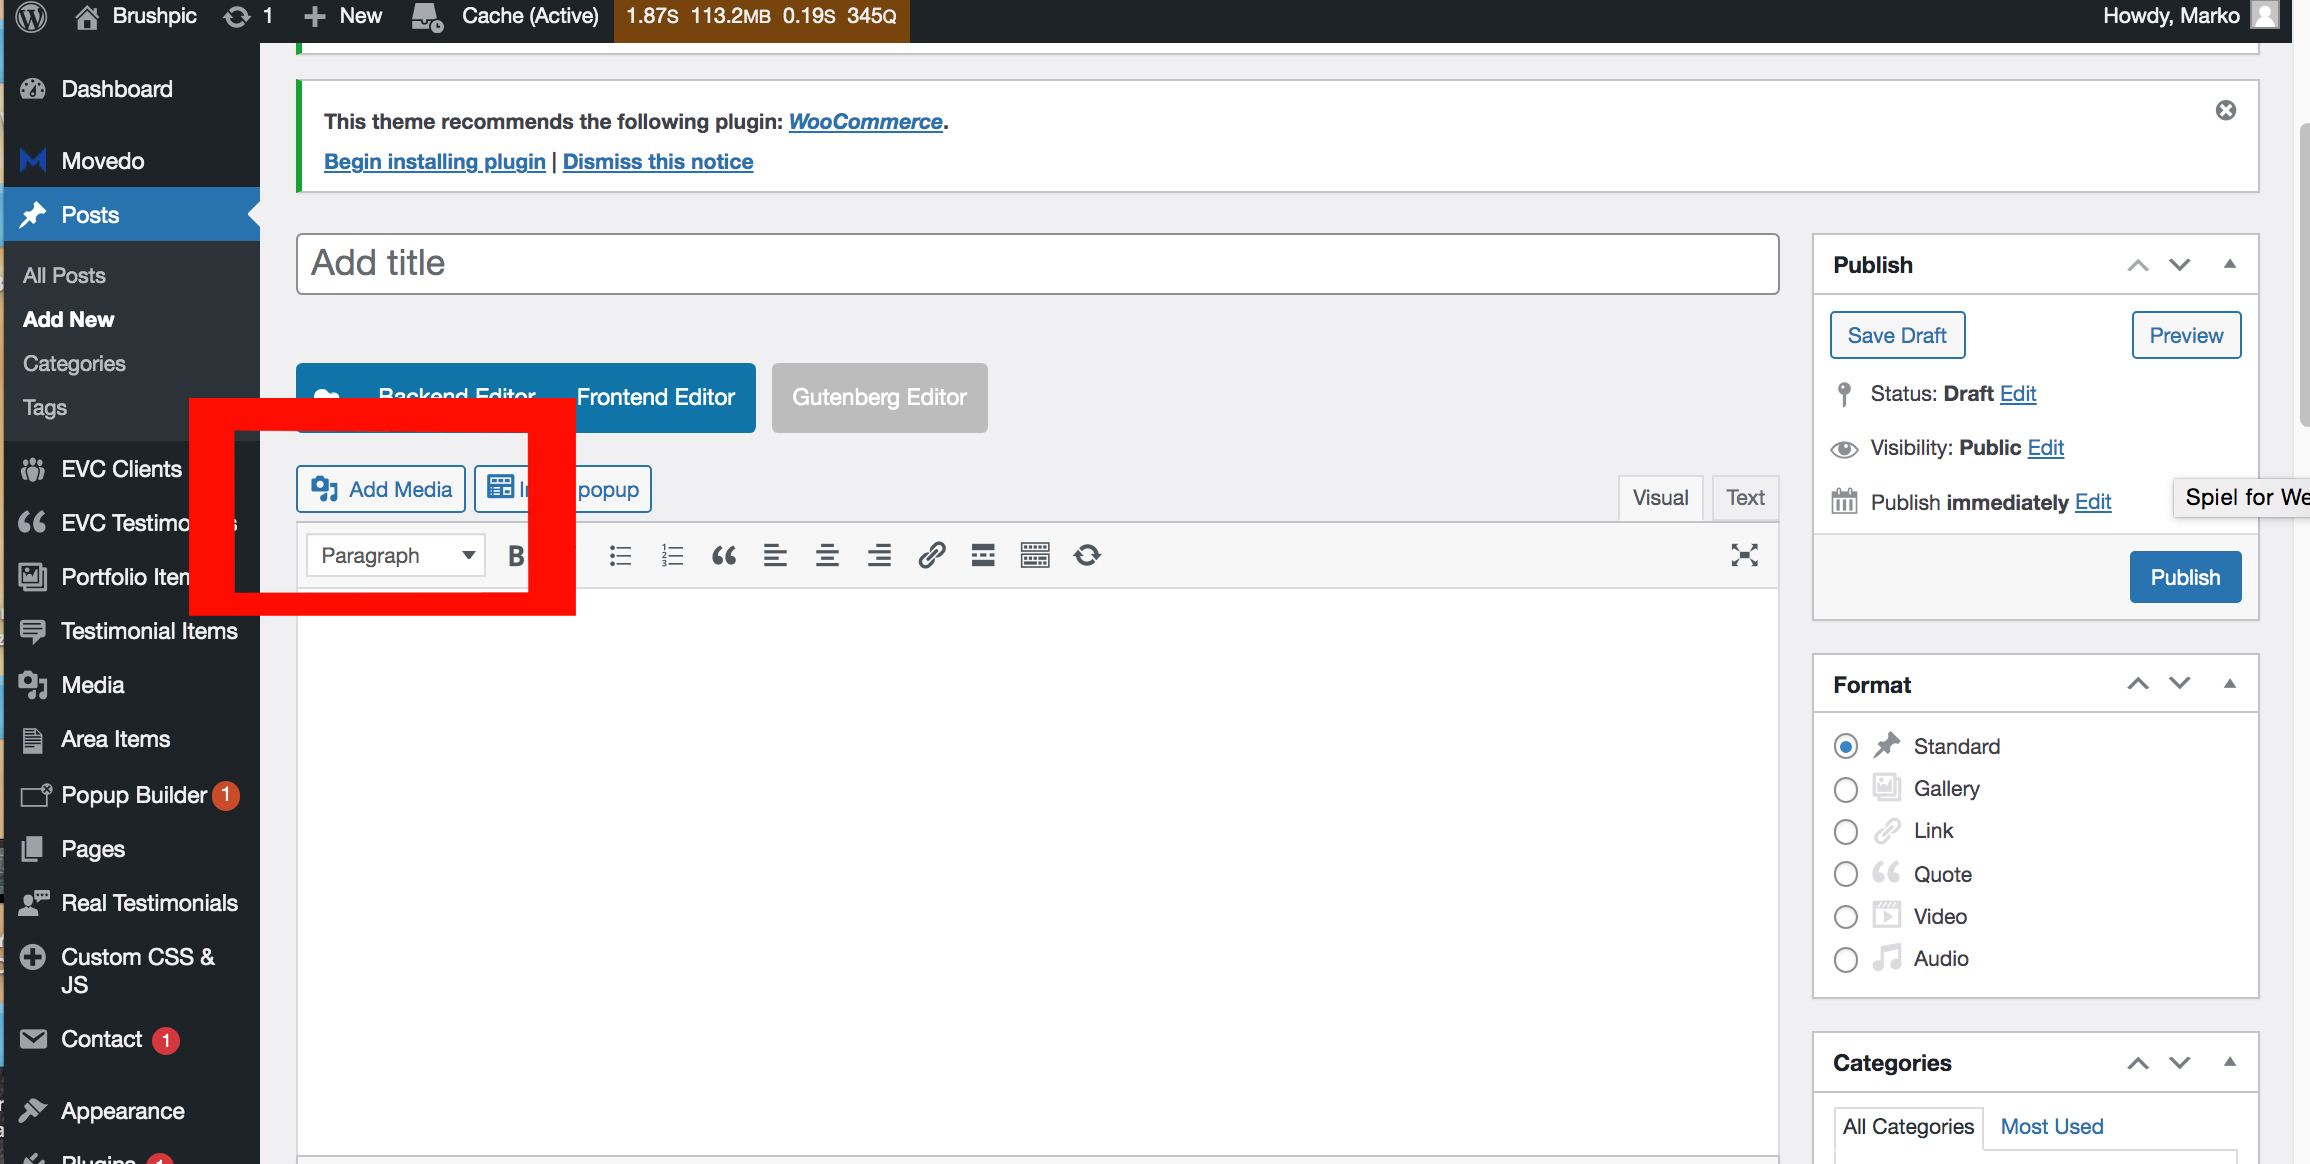
After logging into WordPress, you will land on your dashboard, which looks like this. Hover on Posts on the left menu and click Add New.


STEP 2: Adding Title and Writing Content

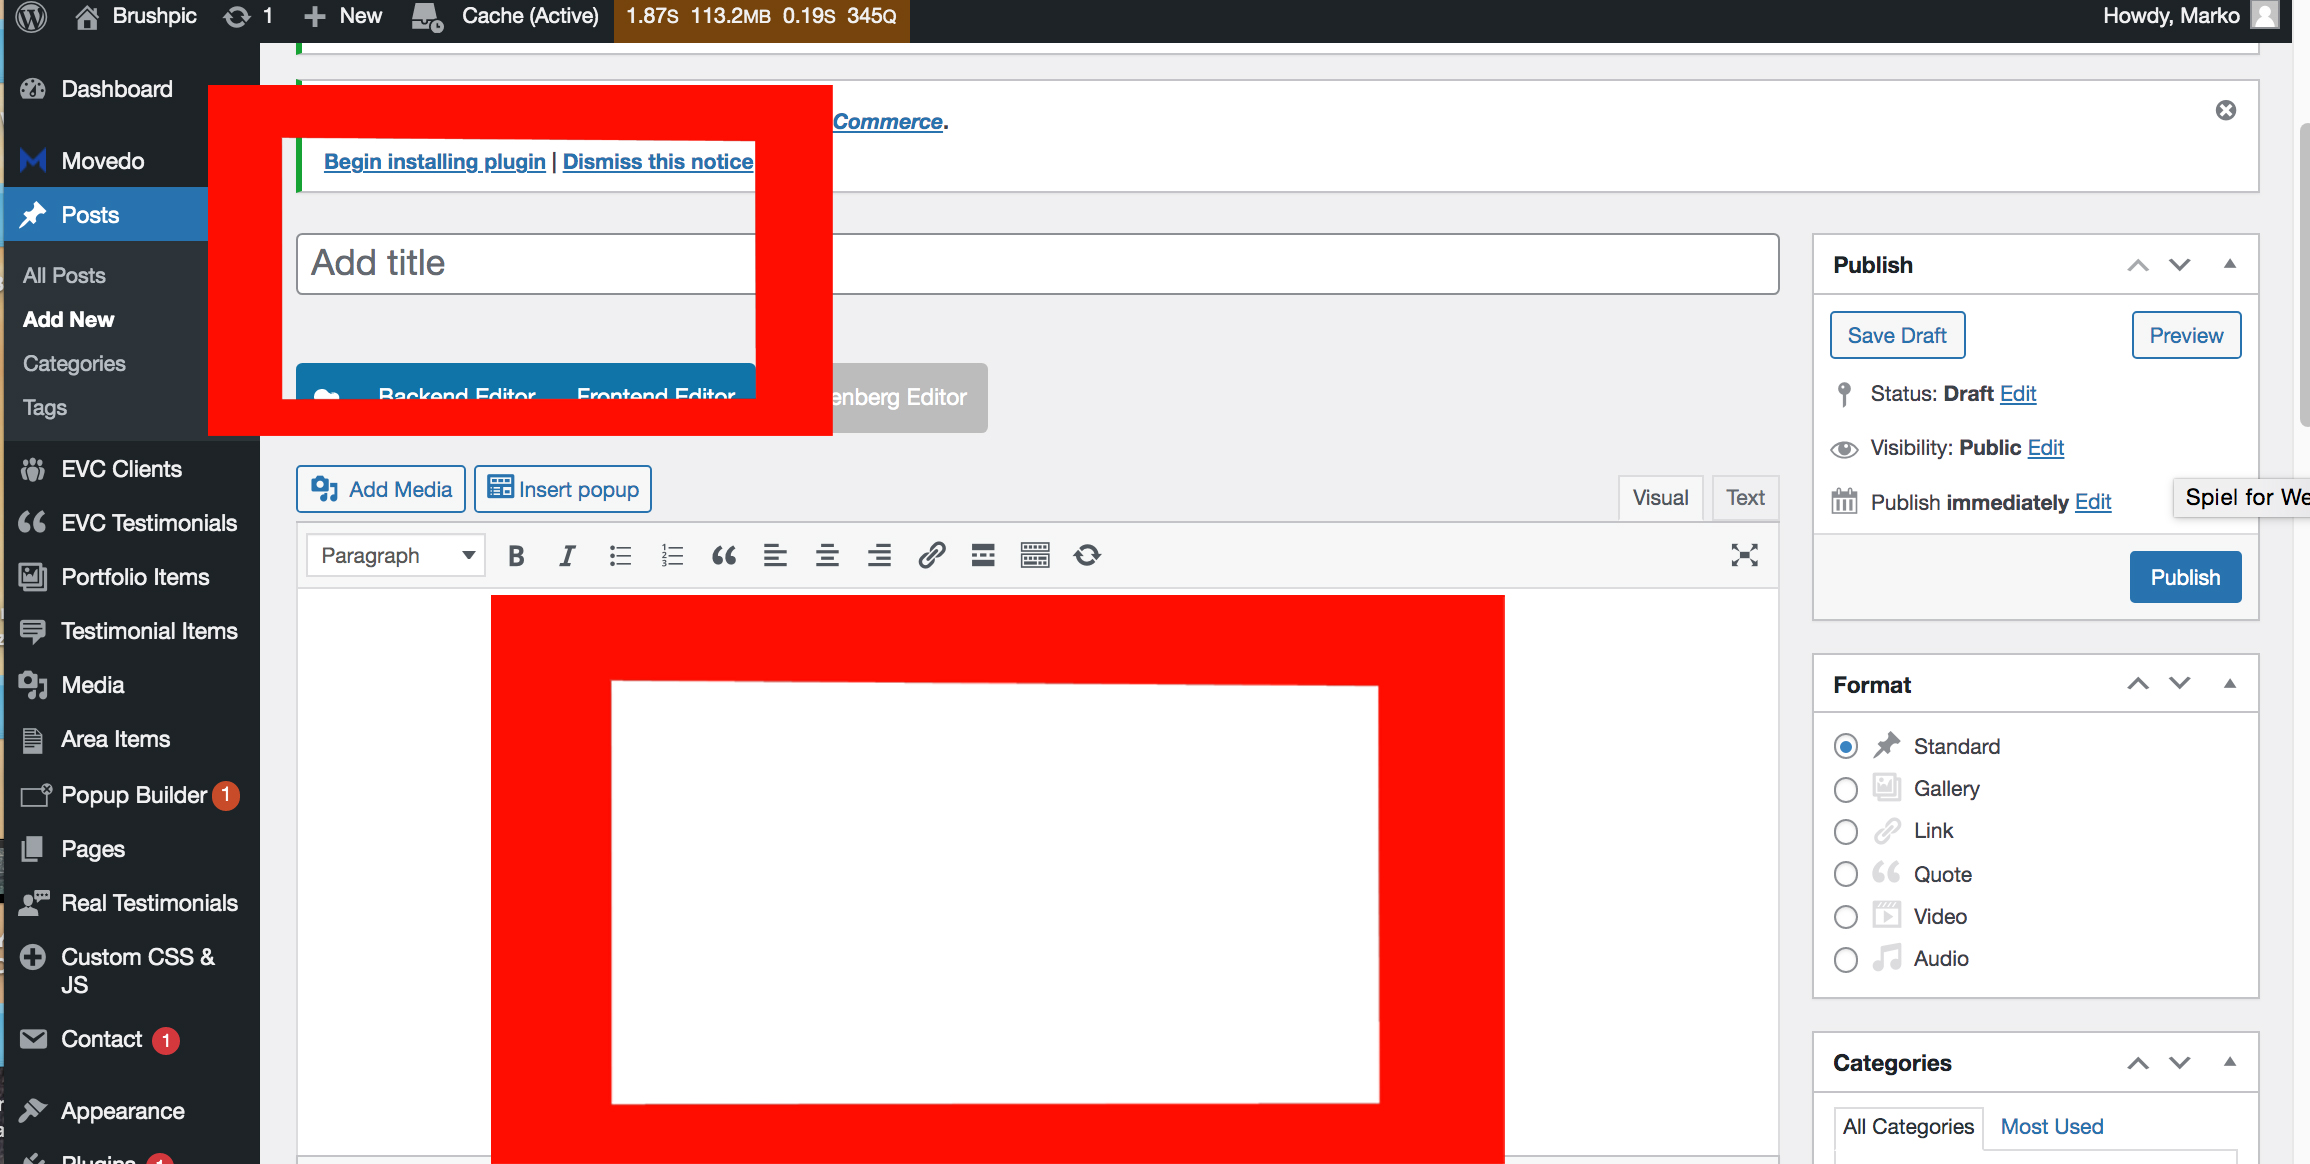
You can add your title in the first bar and you may start writing your content in the succeeding space.


STEP 3: Adding Photos to your Blog

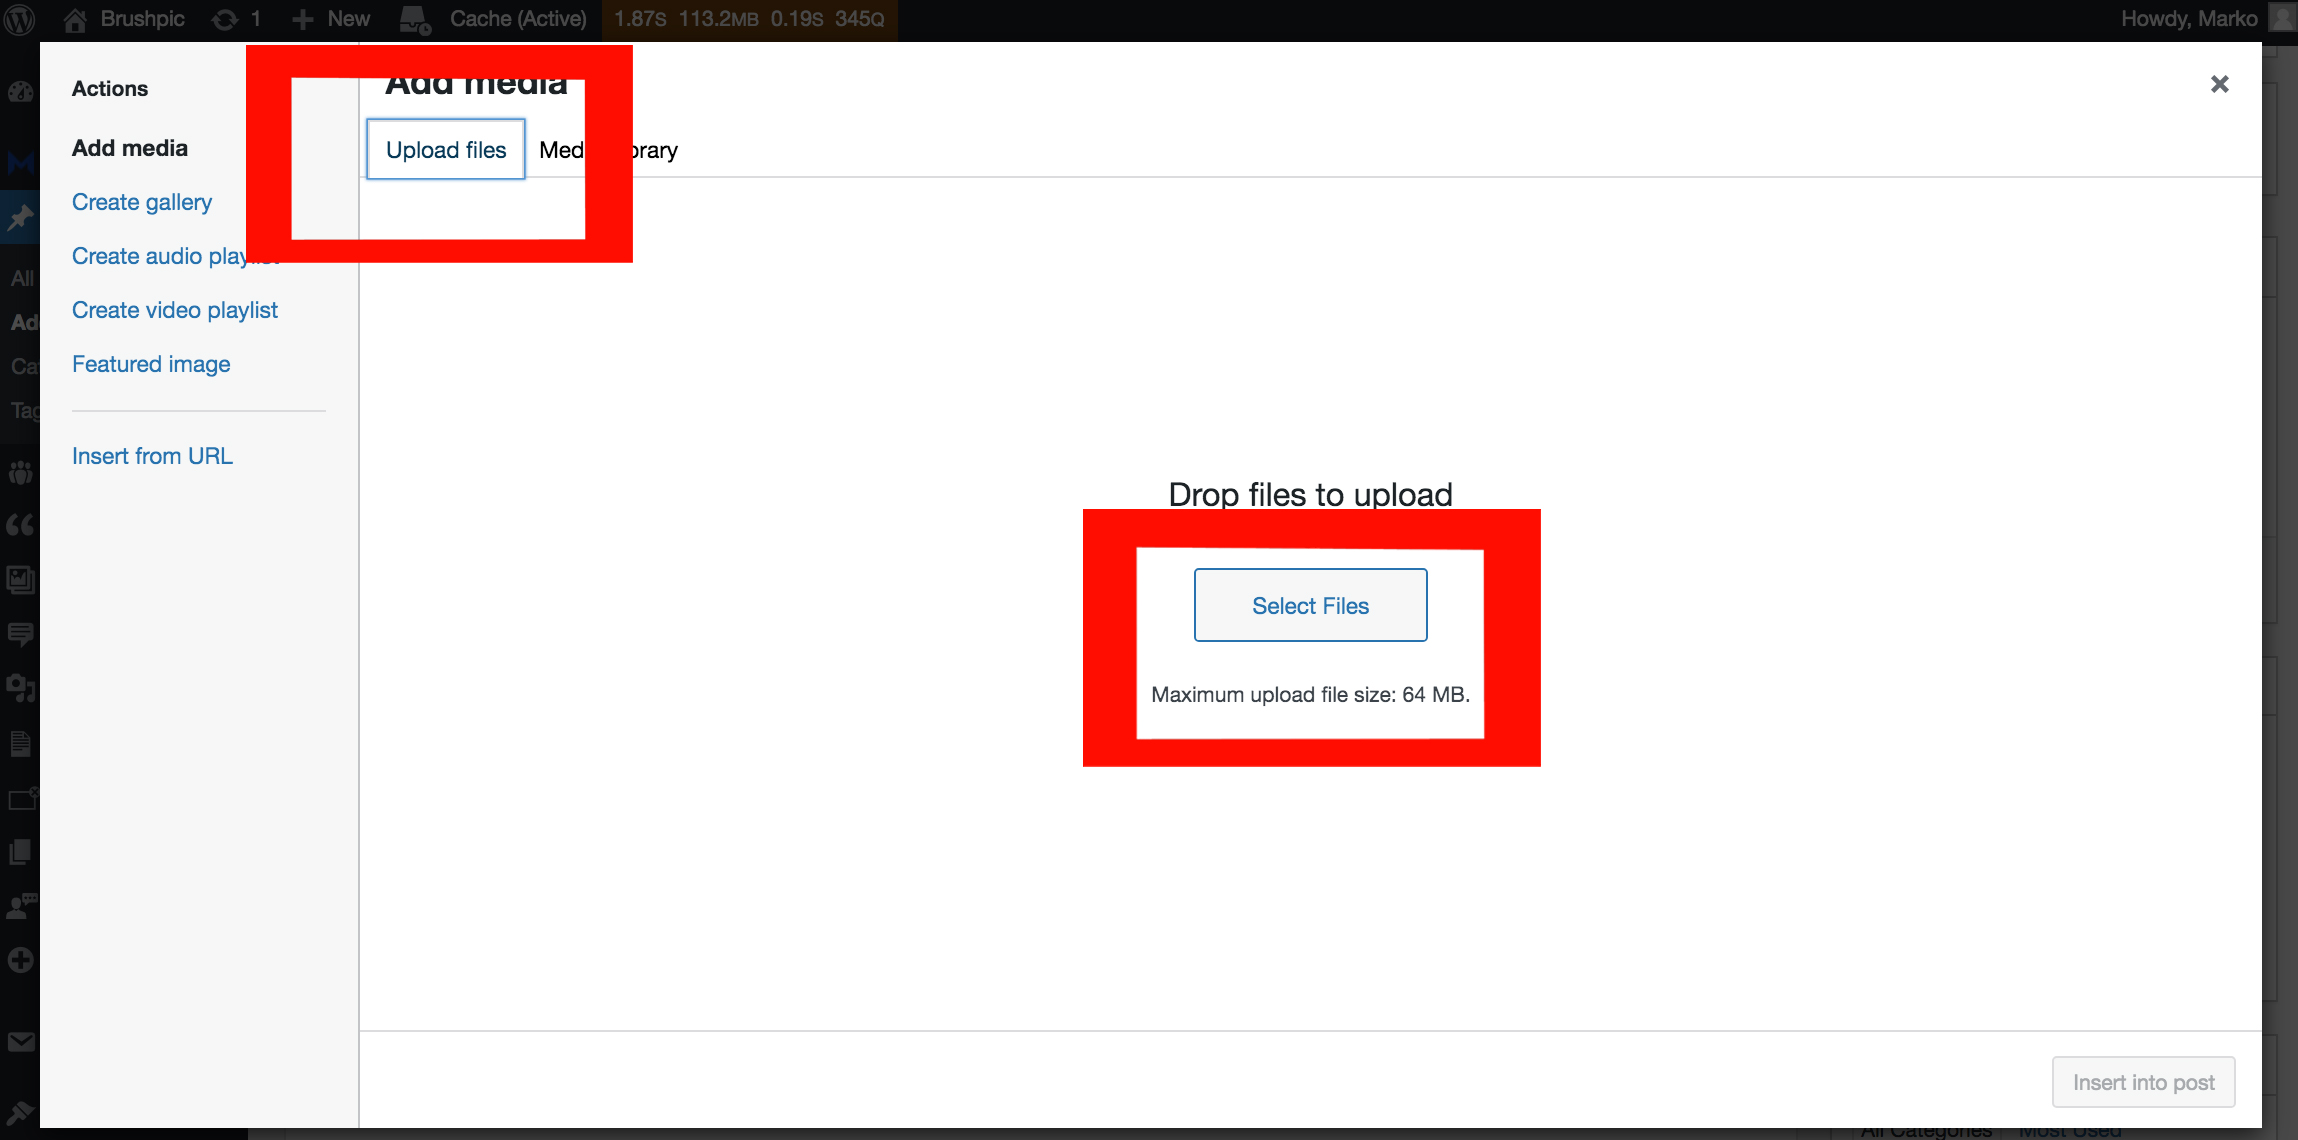
Blogs are not complete without enticing photos! What you can do is click Add Media.


You can choose to upload your own photos by clicking the Upload Files tab, then Select Files. Keep in mind that the limit for each photo is only at 64 MB.


STEP 4: Adding Featured Image

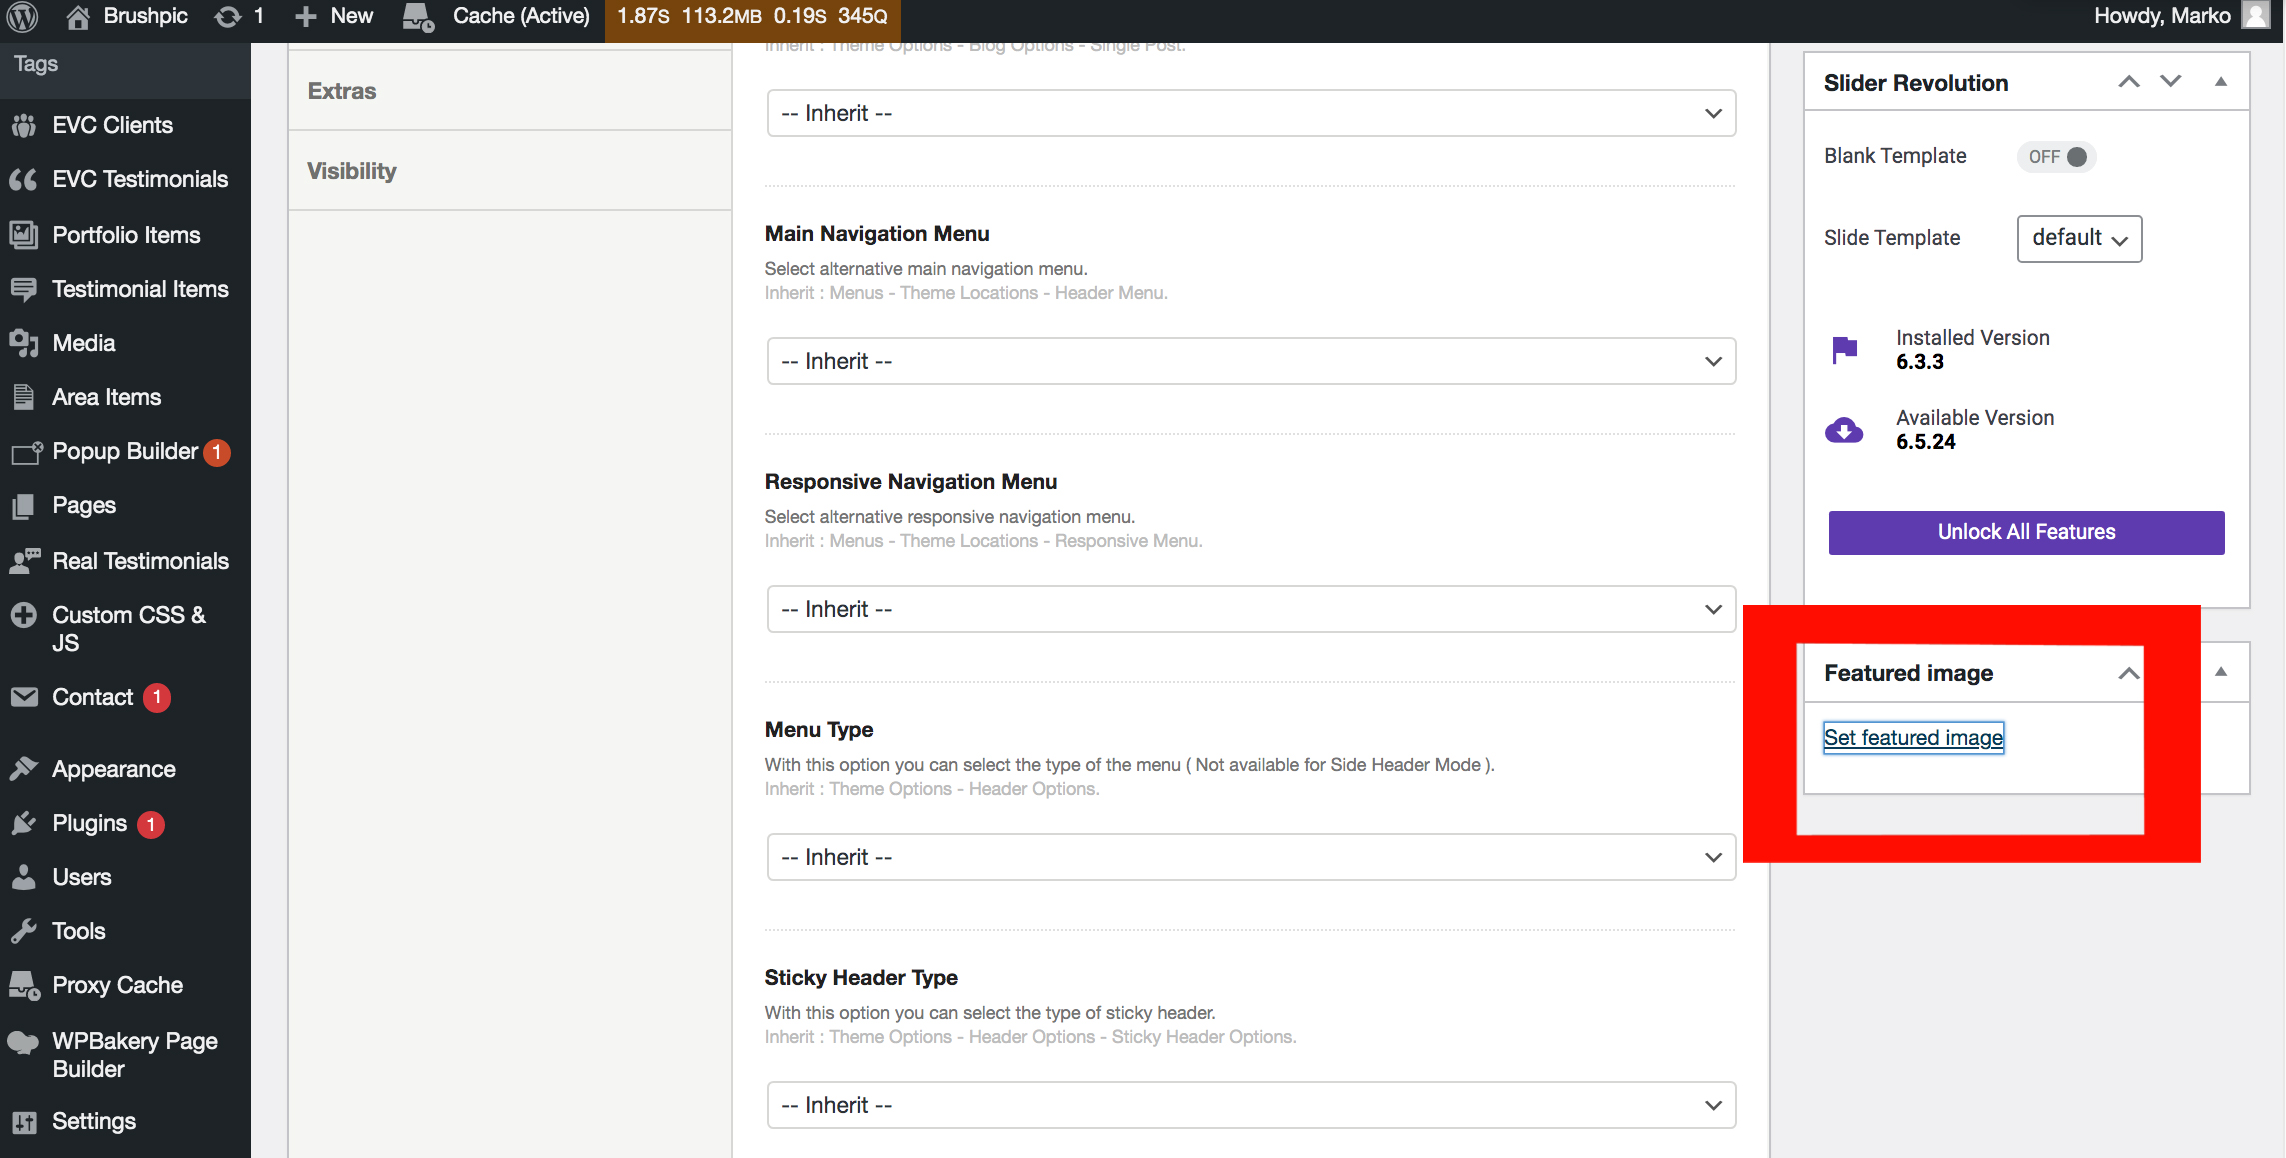
Featured Images are the ones that appear on your Blog List as more or less the intro on what your blog is about (aside from the title)

Just scroll down on the page and look for Set Featured Image on the right.


STEP 5: Save Draft, Preview and Publish

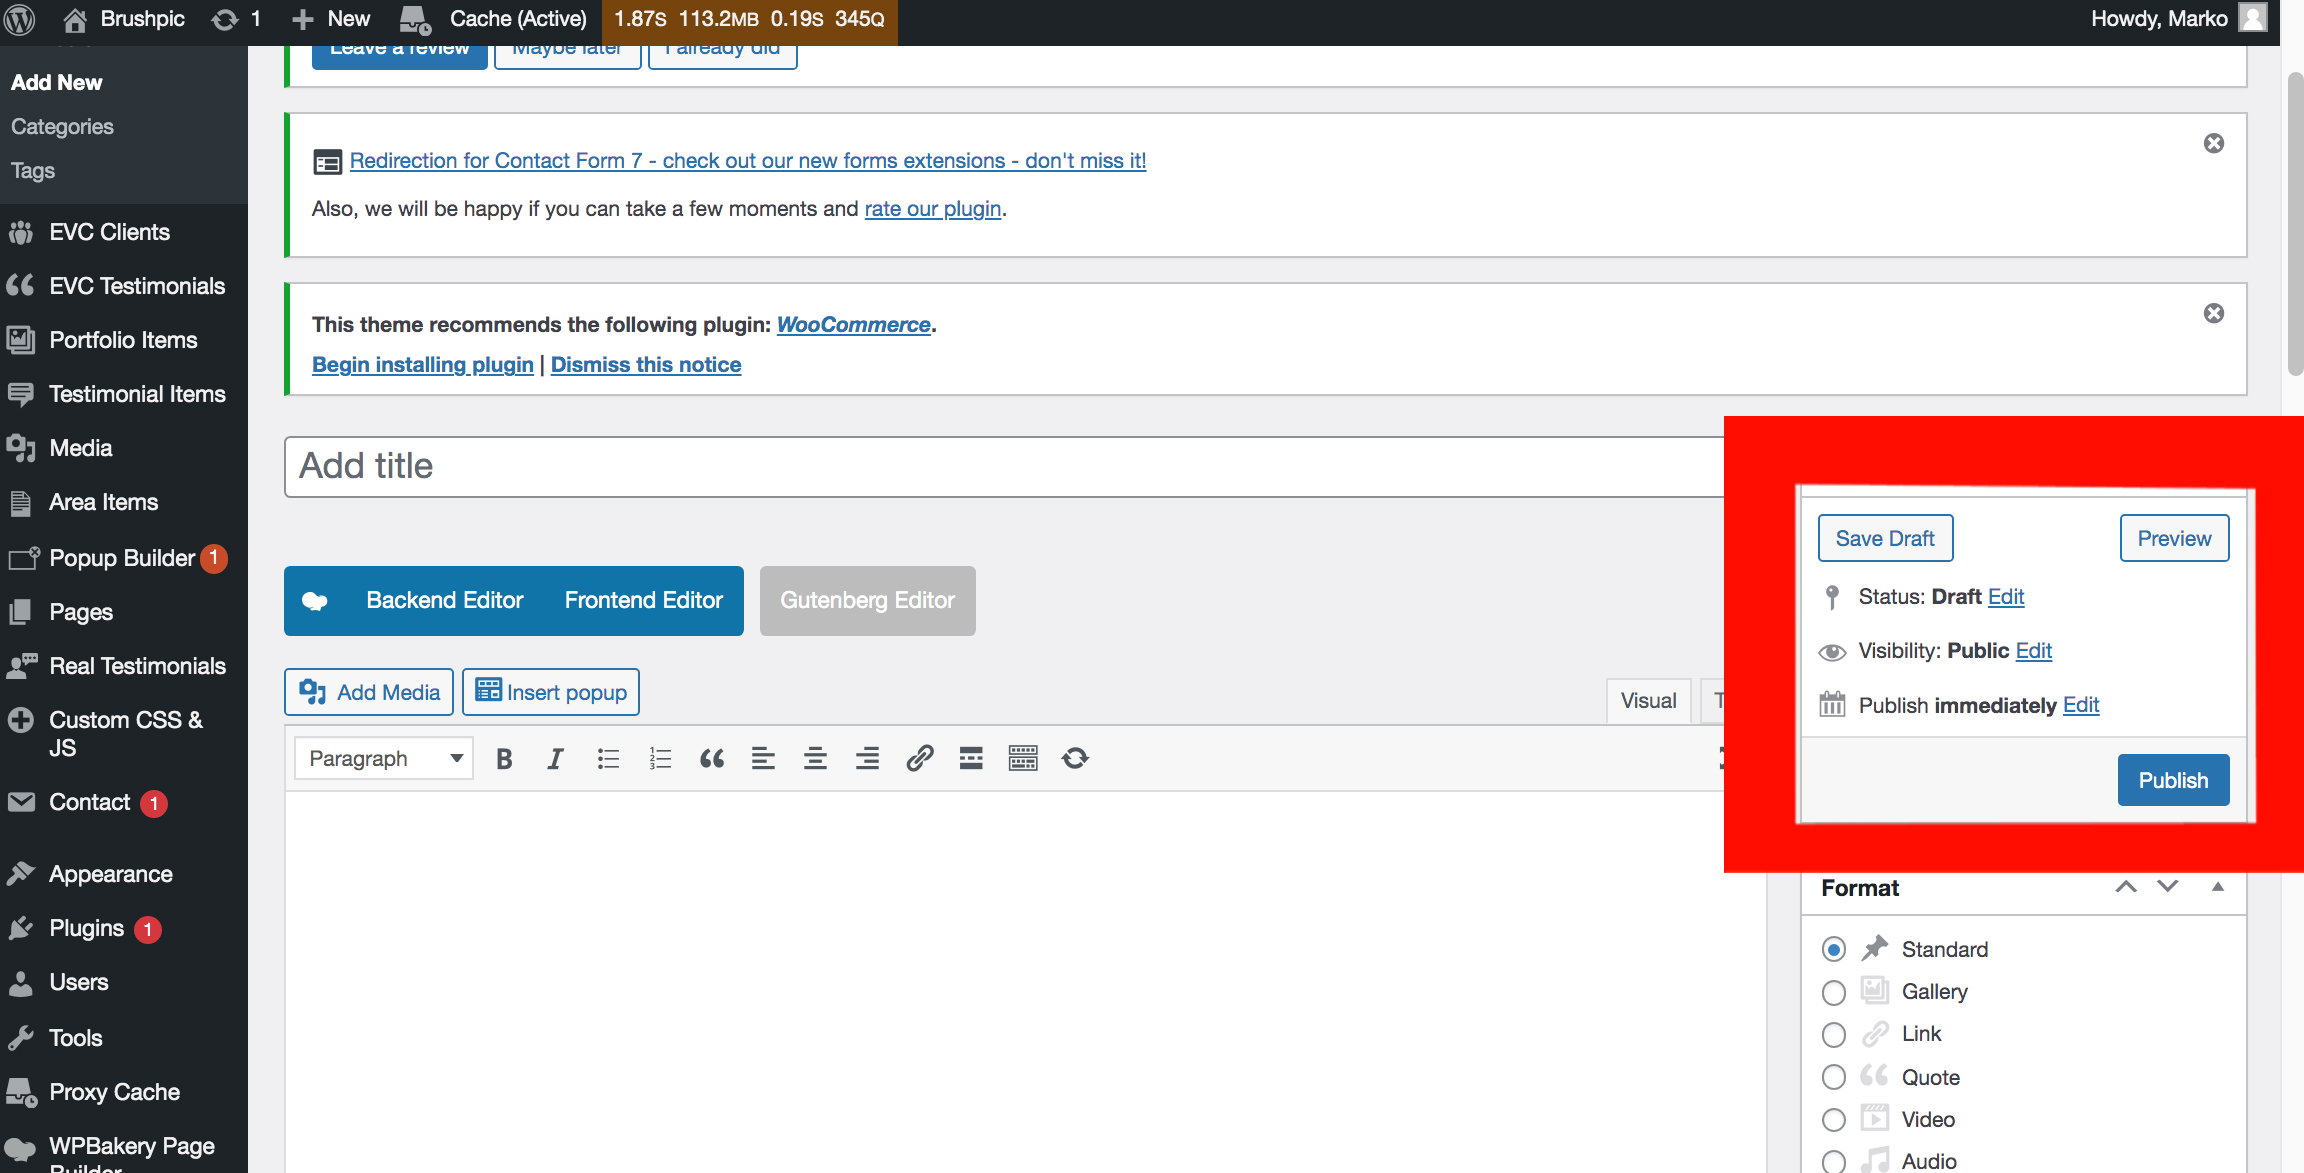
Save Draft: If you don’t want to publish your blog yet or you’ll get back to it another time, just click Save Draft.

Preview: If you want to see how your blog will look, just click the Preview button and a new window will open.

Publish: When you’re ready for the blog to be seen by the world, just click Publish ☺


And that’s it! We hope that this guide makes it easier for you to post your blogs. You may also look at our other guides here to make your experience easier!

For more questions and inquiries, you may also schedule a call with us here:

https://calendly.com/ohenewa-71/15min?month=2022-06

How to Add Banner in a WordPress Blog

How to Add Banner in a WordPress Blog 2560 1707 Michael Okai

Excited to post your new blog? We know the feeling 🙂 But something is not right. The blog photos are in there, your post is SEO friendly and your discussion is well-researched. So, what’s missing?

Yes, that big black space underneath the title that is sometimes too difficult to find. We got you. Here’s our step-by-step guide on how to add banner in your WordPress blog. Photos and screenshots are included too, you may thank us later 🙂


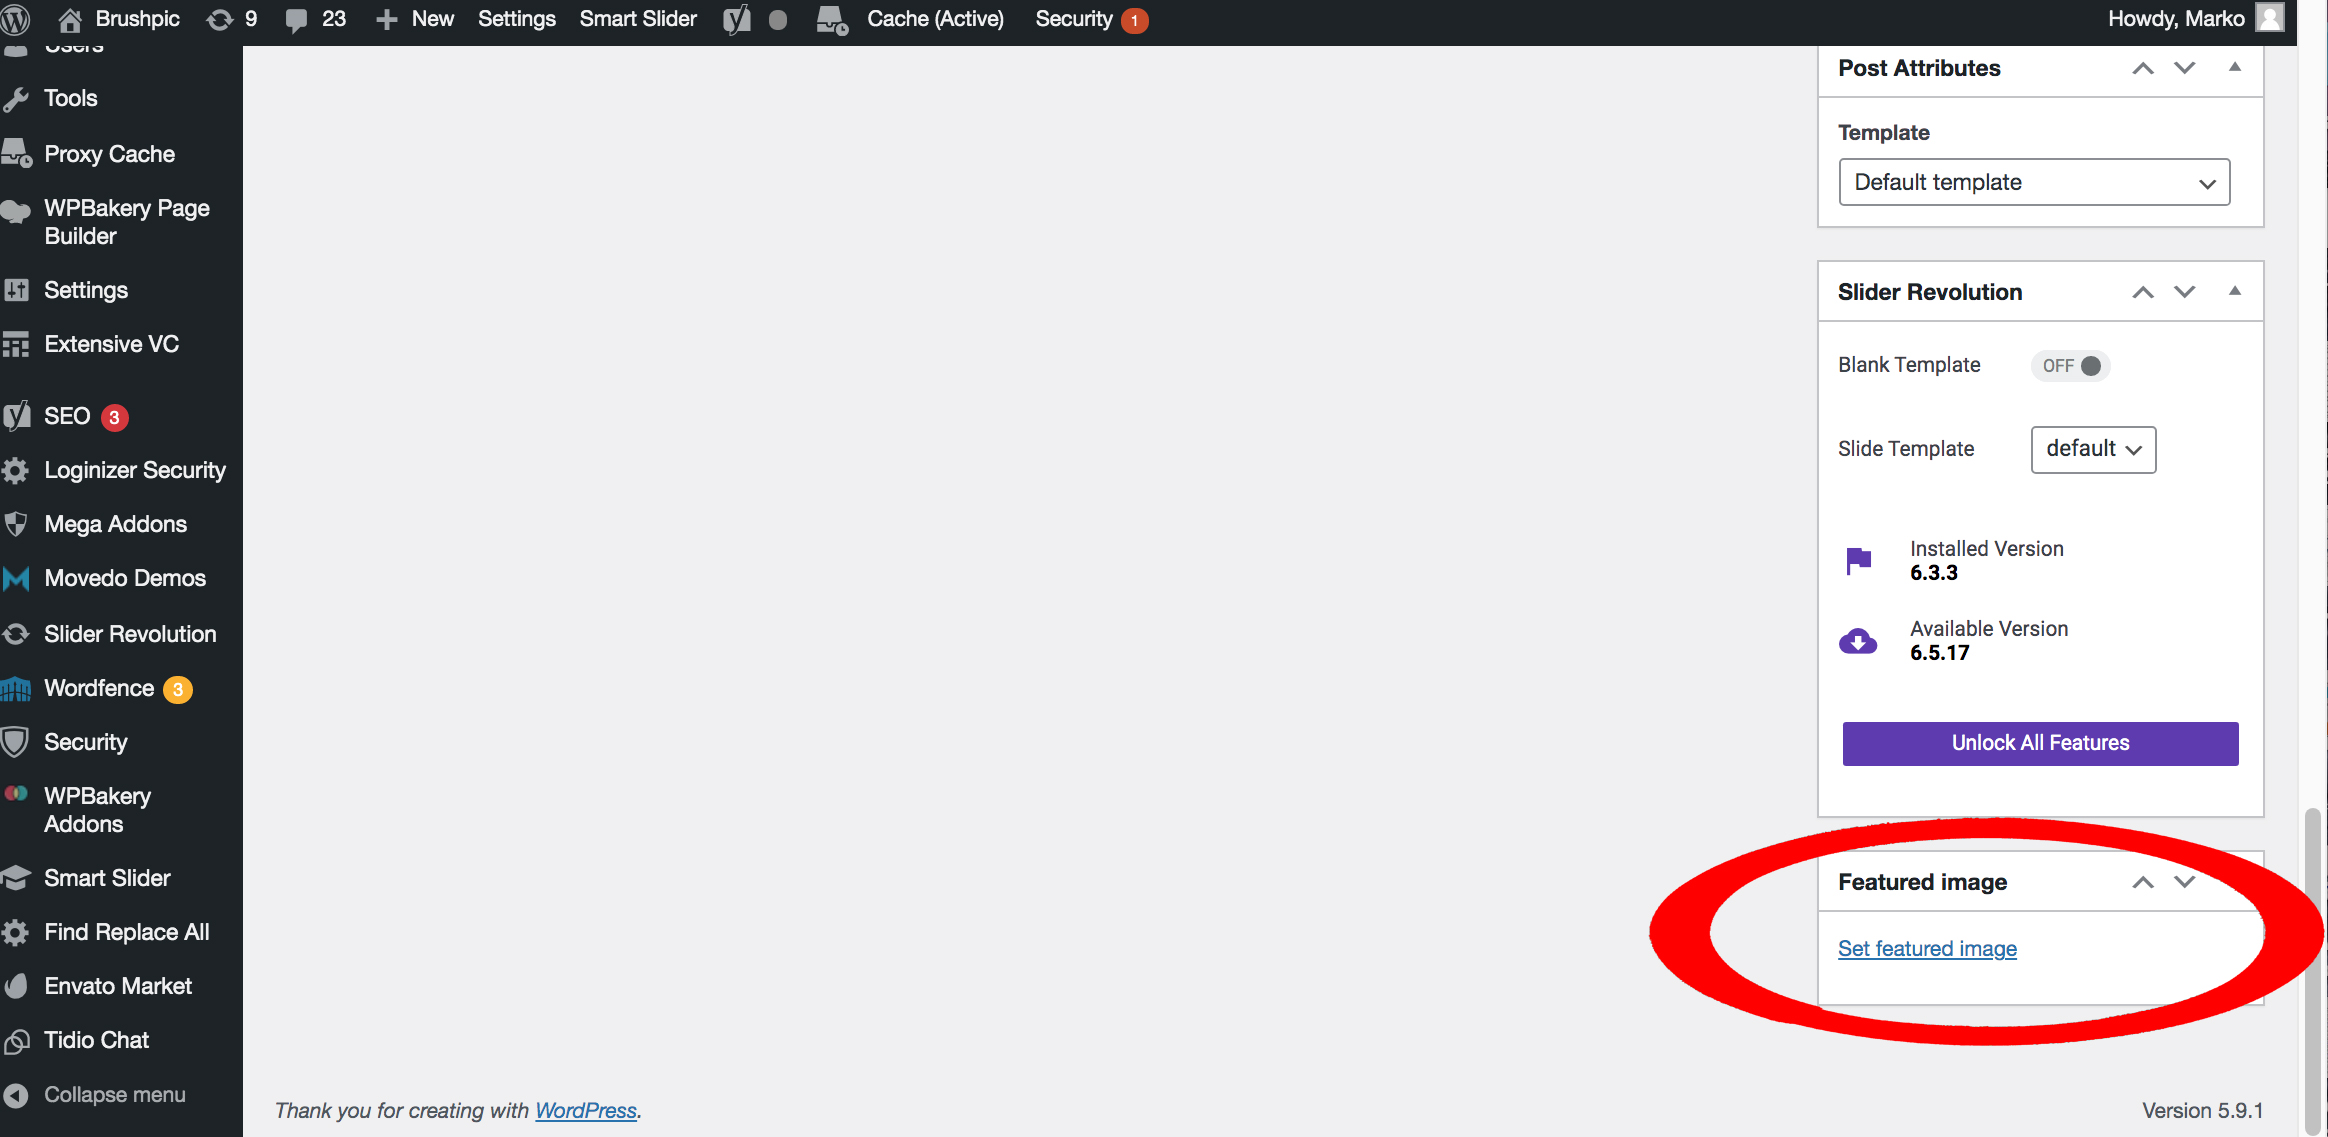
STEP 1: Set your featured image

This will be the image that WordPress will use as a preview photo on this specific blog. And ideally, this is also the photo that you should use as your banner to create consistency in your site.


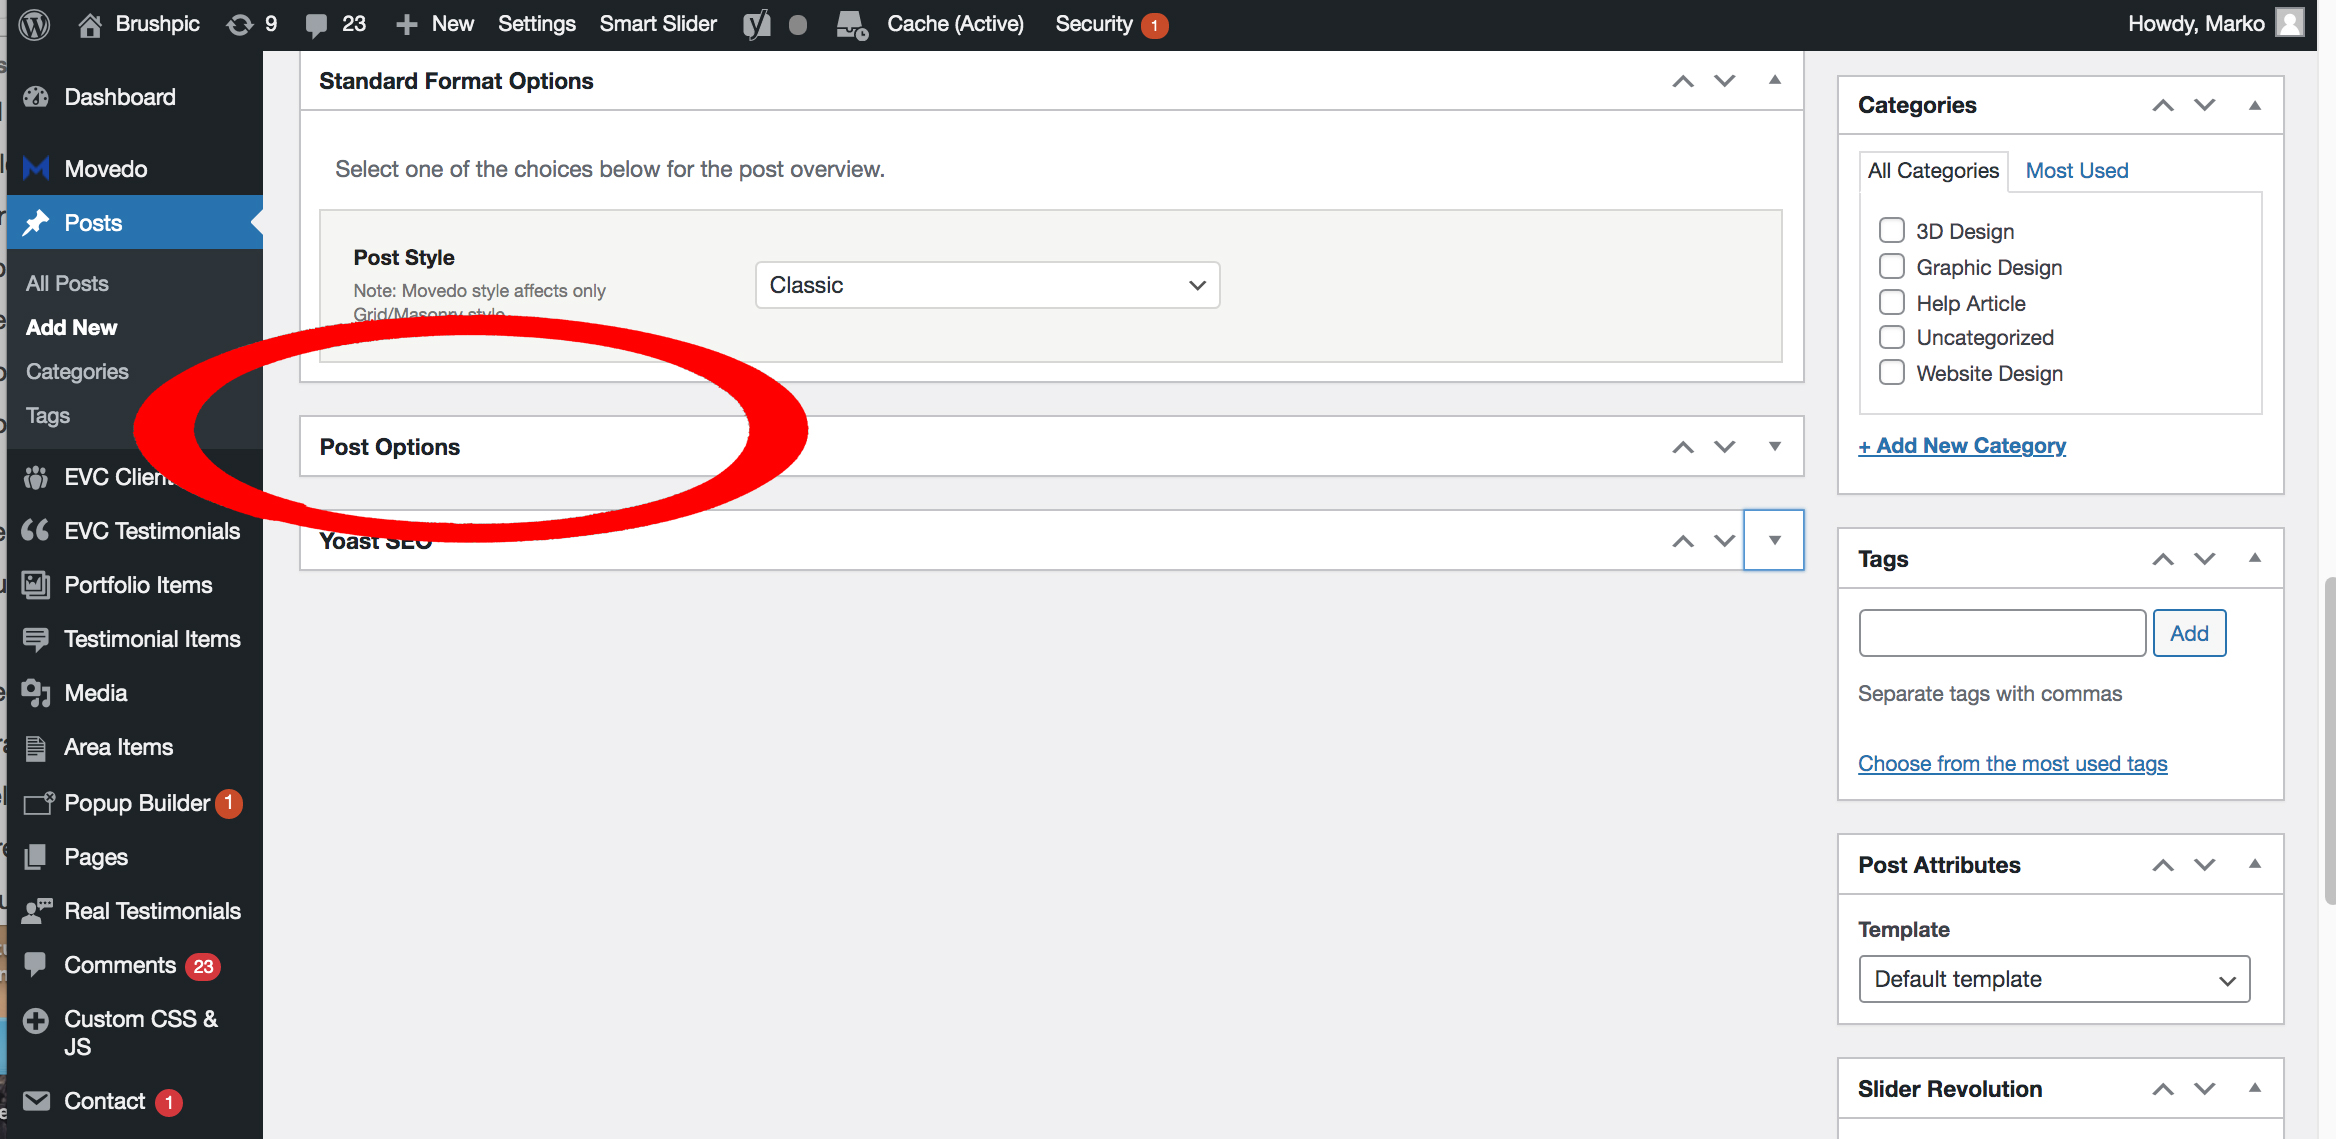
STEP 2: Look for Post Options

Scroll down in the WordPress window and look for Post Options. It may be expanded or minimized like how it looks here.


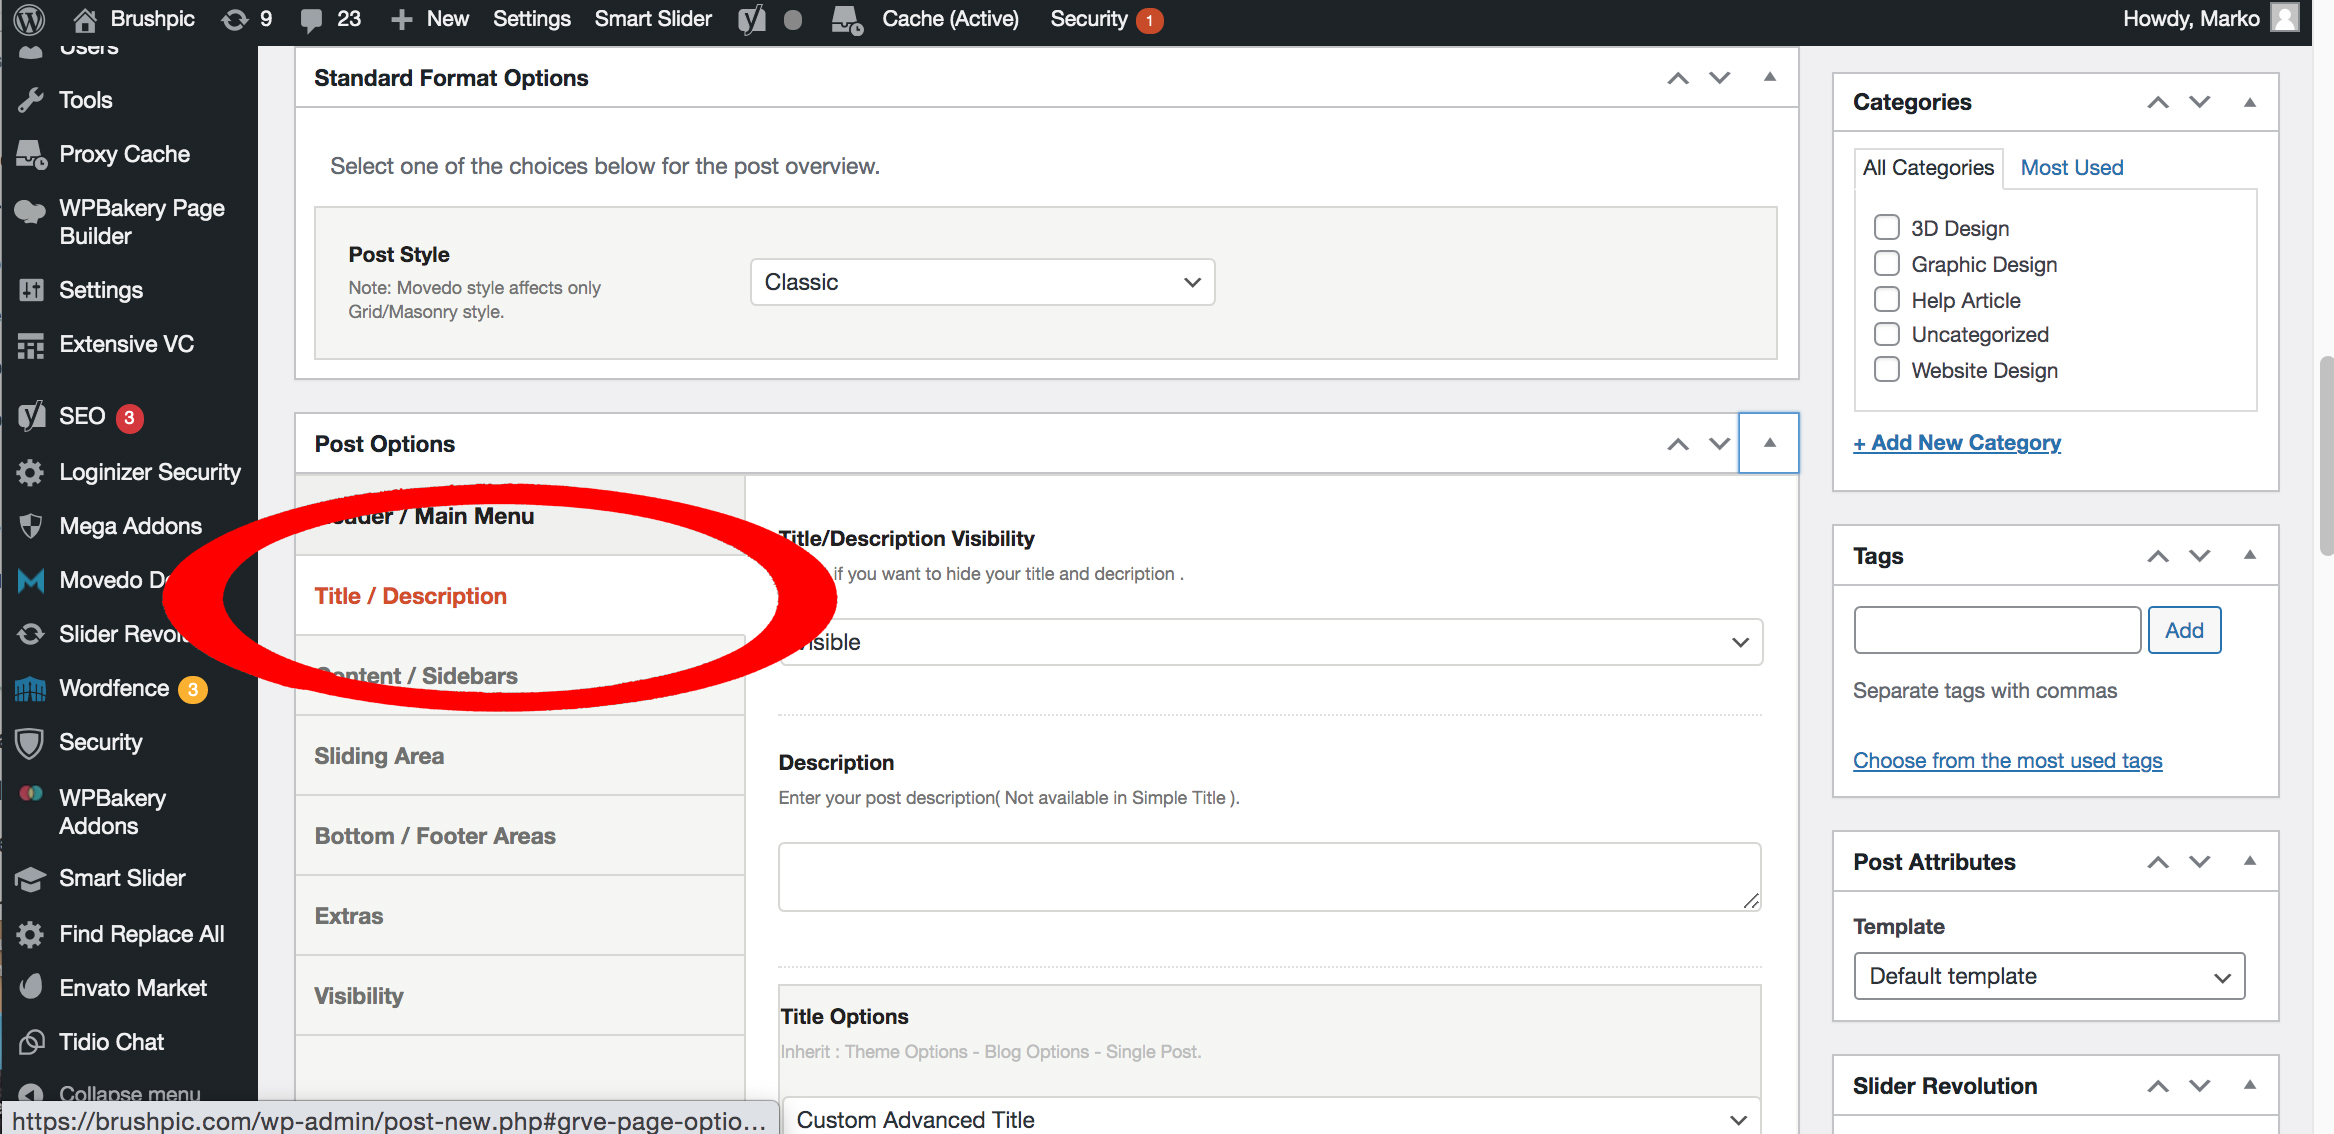
STEP 3: Click Title / Description

Once the the Post Options area expands, there will be a navigation area on the left side of the screen that will appear. Look for the Title / Description tab.


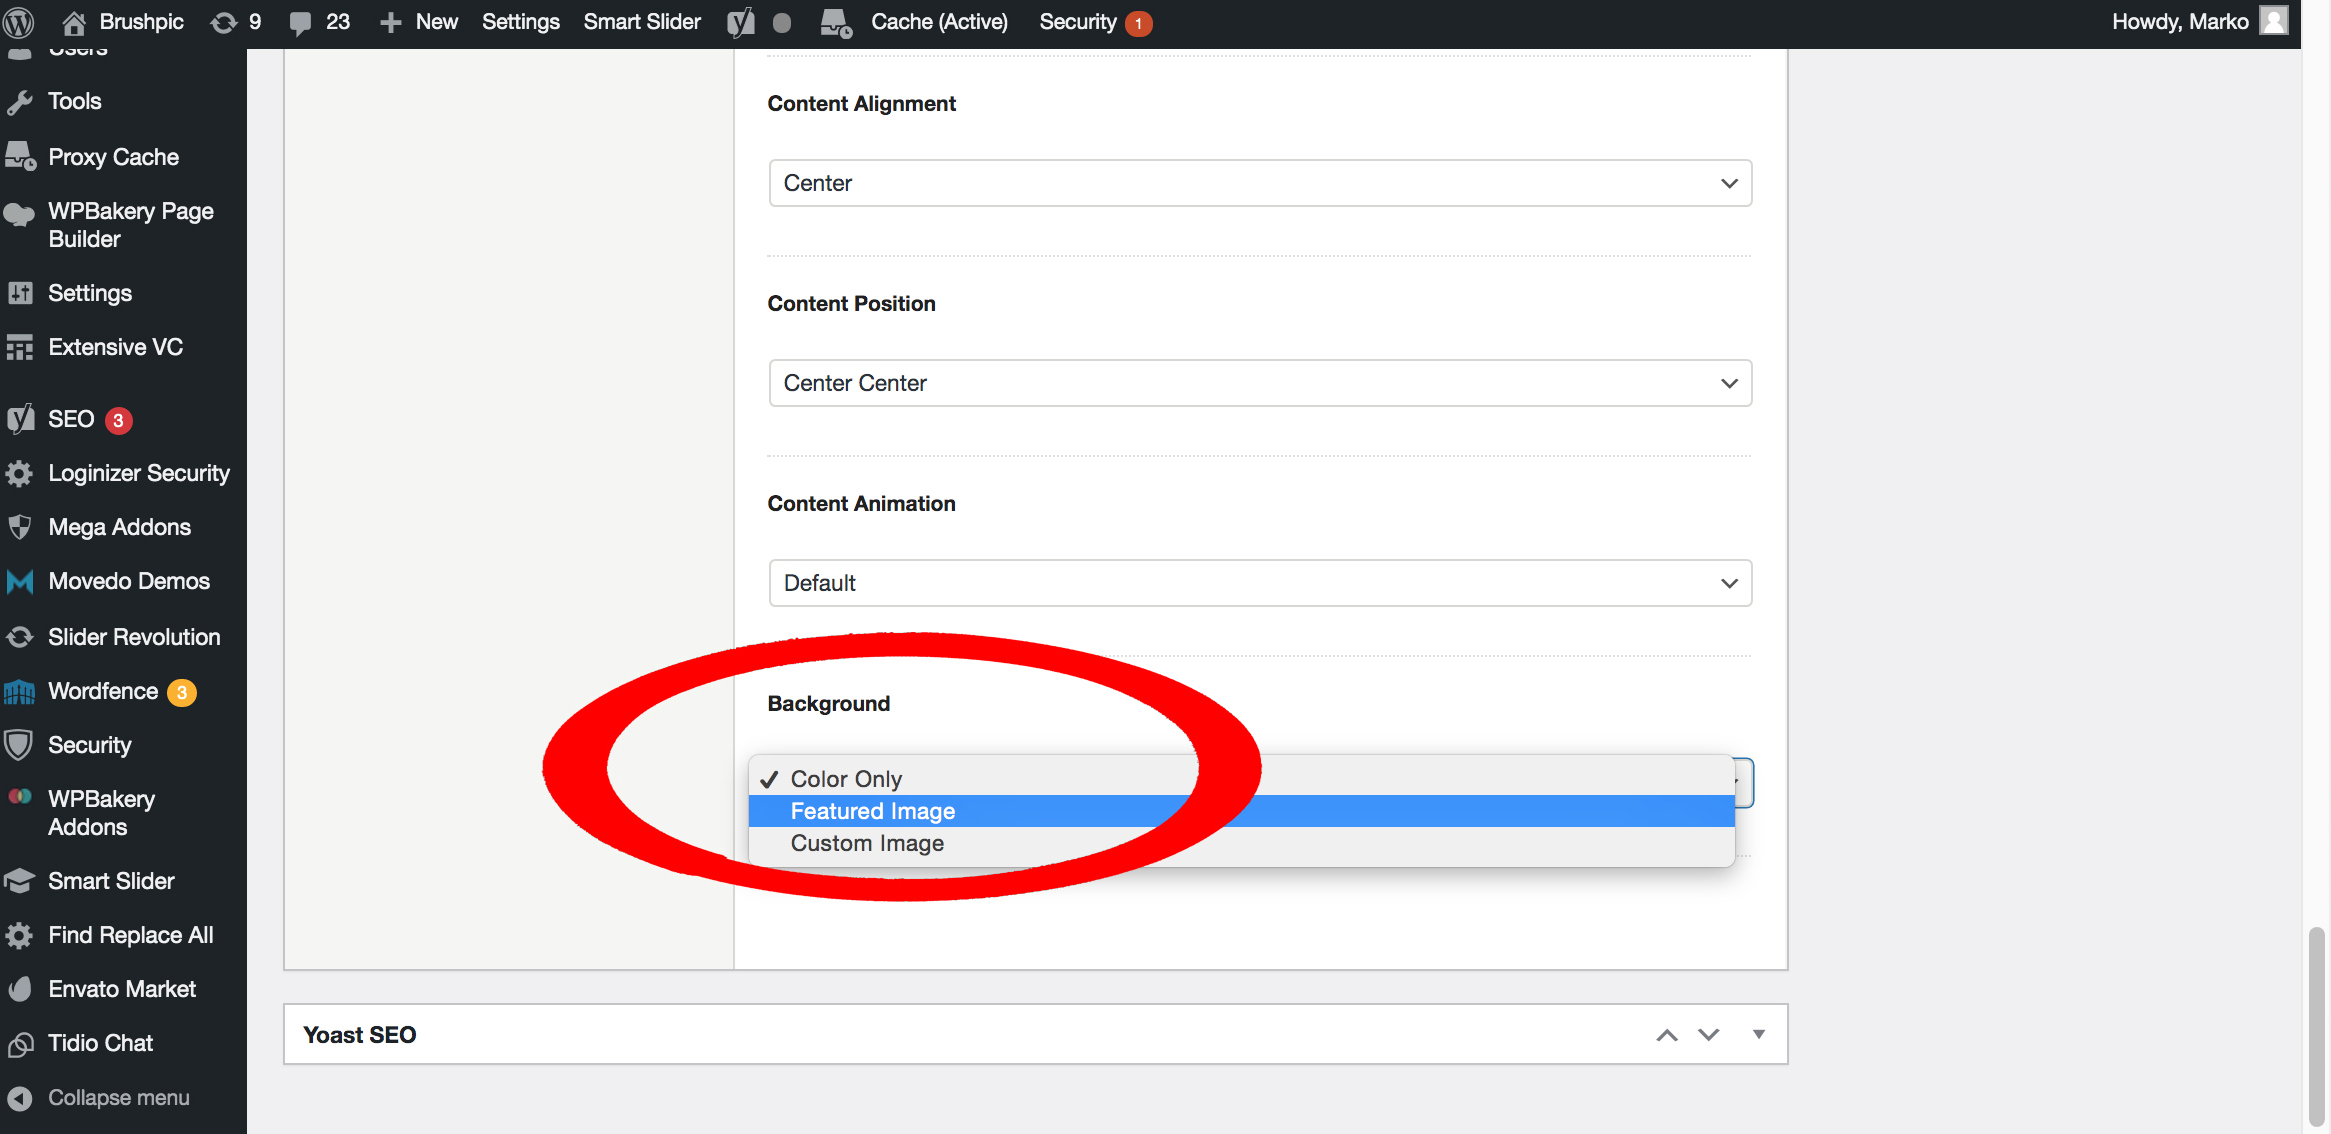
STEP 4: Click Featured Image

Scroll down and look for Background. Since we already have a Featured Image, we can now choose this option as our banner


STEP 5: Preview

Always preview your work before publishing. You may also adjust the overlay to make sure that your title can be easily read. In this case, I adjusted the overlay to about 30%, but let’s save that topic for the next vlog 🙂

Your blog should look like this after. Once you’re ok with everything, just click publish.

_____________________

Woocommerce

In some cases, you may need to update woocommerce product category banners. Please follow the instructions below:

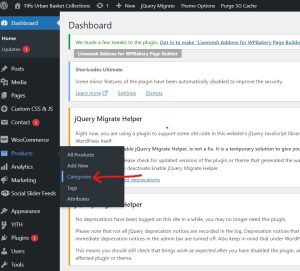
STEP 1: Click on Products -> Categories

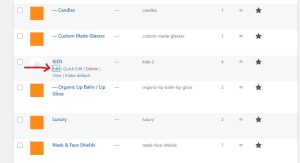
Step 2: On the categories page, mouse hover on the category on which you want to update/add the banner image or video. Click on Edit

Step 3: To have an image as a banner on the product category, Upload an image by clicking the upload/add image button next to “Thumbnail” option.
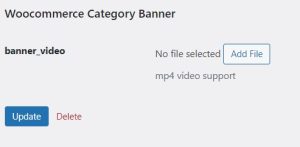
To upload a video remove the image from the thumbnail in case you have already uploaded an image earlier, and then click on “Add video” button under banner_video option


Step 4: Click on update button. That’s it. Your product category should have a banner image/video now visible on the website.


We know. This is too much of a hassle to do every single time you’ll be posting. Add the fact that you have to type in every single word in your blog and add relatively interesting photos as well makes this task annoying.

Let us do it for you. We do not only build beautiful websites, but also manage them perfectly! Let’s talk, tell us all your problems, and we’ll solve it for you 🙂

https://calendly.com/ohenewa-71/15min?month=2022-03


How do I update wordpress?

How do I update wordpress? 550 400 Michael Okai

WARNING: The upgrade process will affect all files and folders included in the main WordPress installation. This includes all the core files used to run WordPress. If you have made any modifications to those files, your changes will be lost.

You should always update WordPress to the latest version. When a new version of WordPress is available you will receive an update message in your WordPress Admin Screens. To update WordPress, click the link in this message.

There are two methods for updating – the easiest is the one-click update, which will work for most people. If it doesn’t work, or you just prefer to be more hands-on, you can follow the manual update process.

If you are updating across multiple versions, follow the procedure at Upgrading WordPress – Extended Instructions

Back up WordPress

Before you get started, it’s a good idea to back up your website. This means if there are any issues you can restore your website. Complete instructions to make a backup can be found in the WordPress Backup.

Automatic Background Updates

For WordPress 3.7+, you don’t have to lift a finger to apply minor and security updates. Most sites are now able to automatically apply these updates in the background. If your site is capable of one-click updates without entering FTP credentials, then your site should be able to update from 3.7 to 3.7.1, 3.7.2, etc. (You’ll still need to click “Update Now” for major feature releases.)

One-click Update

WordPress lets you update with the click of a button.  You can launch the update by clicking the link in the new version banner (if it’s there) or by going to the Dashboard > Updates screen. Once you are on the “Update WordPress” page, click the button “Update Now” to start the process off. You shouldn’t need to do anything else and, once it’s finished, you will be up-to-date.

One-click updates work on most servers. If you have any problems, it is probably related to permissions issues on the filesystem.

Reference: https://wordpress.org/support/article/updating-wordpress/

Site Maintenance: What the client needs to know

Site Maintenance: What the client needs to know 1200 603 Michael Okai

A Simple Guide for BrushPic Clients

Your website is an important part of your business. Keeping it updated helps protect it from

security issues, improves performance, and ensures everything continues to work
properly.
The good news is that basic website maintenance only takes a few minutes each month.

Before You Make Any Updates
Before updating your website, make sure a recent backup is available.

How to Check
Ask yourself:
• Does my hosting provider create automatic backups?
• Has BrushPic set up automated backups for my website?
• Do I know how to restore my website if something goes wrong?

If the answer to any of these questions is “No” or “I’m not sure,” contact BrushPic before
making updates.

Important: Never make updates if you are unsure whether a backup exists

Read this article on: How to back up your WordPress website.

Updating WordPress
Step 1
Log in to your WordPress dashboard.

Step 2
Look for update notifications at the top of the screen or go to:
Dashboard → Updates


Step 3
If a WordPress update is available, click:
Update WordPress
Wait for the update to complete and do not close your browser during the process.
Step 4
After the update, visit your website and check:
• Homepage
• Contact page
• Service pages
• Shop or booking pages (if applicable)
Make sure everything looks and functions normally.

If an Update Fails
If you see an error message or your website does not load correctly:
• Stop making further changes
• Contact BrushPic for assistance

Updating Plugins
Plugins provide extra functionality such as contact forms, security tools, booking systems,
and SEO features.

To Update Plugins
1. Go to Plugins → Installed Plugins
2. Look for plugins showing an update notice
3. Click Update Now

After Updating
Quickly test:
• Contact forms
• Navigation menus
• Online purchases (if applicable)
• Booking forms (if applicable)

If anything stops working, contact BrushPic.

Monthly Website Check
Once per month, spend five minutes reviewing your website.
Check:
✓ Homepage loads properly
✓ Contact form works
✓ Navigation menu works
✓ Images display correctly
✓ Website looks good on mobile devices
✓ No obvious errors appear

Security Tips
Use Strong Passwords

Avoid passwords that include:
• Your name
• Business name
• Birthdays
• Common words

Use strong, unique passwords whenever possible.

Review User Accounts

Remove access for:
• Former employees
• Contractors who no longer need access
• Anyone who should not be managing the website

When to Contact BrushPic
Please contact us if:
• The website will not load
• You see error messages
• An update fails
• The website looks broken after an update
• Forms stop working
• Online payments stop working
• You suspect the website has been hacked
• You are unsure whether it is safe to proceed

A Good Rule of Thumb
If you are ever uncertain, stop and contact BrushPic before making further changes.
It’s much easier to prevent a problem than to repair one later.

Copyright © 2026 BrushPic. All Rights Reserved.

Refine and Assure Compliance

Every detail is reviewed for accuracy and peace of mind, so your site aligns with compliance requirements, from proper disclosures to clear client-facing communications, all while maintaining a polished, professional look.